APPLICATION FOR SOMETHING
I have been applying for freelance photography jobs with different management companies. I have a list of artists I feel my photography style fits and finding contact details for their management and sending over my portfolio. The email template I have been using is:
I received a response from a management company with an impressive roster, they said they currently don't have anything but have added me to their list of creatives and will contact me in the future when something suitable comes up.
The application process involved me _____.
For this unit, we will be thinking about who we are and where we want to take our career once we finish college. We will be developing our professional persona and presenting ourselves to the creative industries with our CVs, portfolios, networking skills, etc.
UCAS PERSONAL STATEMENT
-
CV
As I want to work in the music industry when I leave college, I tailored my CV to only include experience relevant to that industry. I took out all the information about my part-time hospitality work and instead listed all the music experience I have.
Once I was happy with the draft, I had a friend in the industry (who works at a label) read over it and check it was alright. I had listed my experience by relevance, but she said it would be better to change the order to by date, starting with the most recent at the top. I adjusted this and she checked it again and said it was perfect.
CASE STUDIES
-
PRACTICAL SKILLS
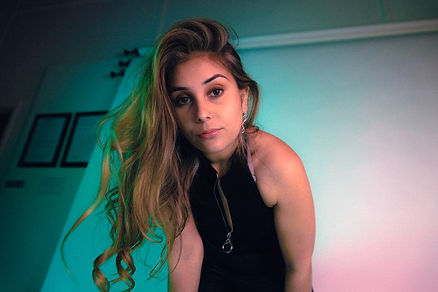
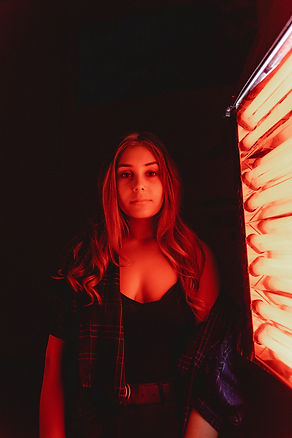
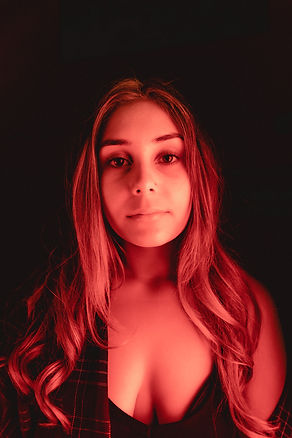
ALICIA DUTTON - 29.04.2021
To edit the photos of Alicia, I used my usual editing software - Lightroom & Adobe Photoshop.
The first thing to do was sort out the photos and narrow them down to the best few. This took a couple of hours as there were 501 and I was planning on only finalising around 30.
Once this was done, I had to set on an editing style to use. As there are many different lighting setups used, I wasn’t able to use just one preset – I had to make drastic changes to the settings depending on the lights. This was due to them being different colours – therefore requiring different white balances, hues, and colour grading.
I started off with presets I already have saved from previous shoots and seeing if any of those worked. Presets are pre-saved editing settings you can set up to make your editing process a lot faster and ensure you have your own style established.


In these photobooth-style photos, I held an orange colour-gel over the lens to give the orange film effect. I used two different presets to edit these. The one on the left was just a classic ‘35mm’ style one I have used previously on photos where I’ve used the colour-gel, and the one on the right was a film one I usually use on outdoor photos.
I felt like the first photo was too ‘boring’ and the orange too bright, however when I turned down the saturation to try to lower the orange it didn’t look great. I duplicated the photo and put a different preset on to see if I could improve the photo. The next preset worked a lot better and added lots of cool colours to the photo. I sent both photos to Grace to see what she thought and she also preferred the second edit.
I copied these settings and pasted them on photos with the same lighting (purple and green). This preset worked on all of these too and I only had to make a few small adjustments on them (shadows, highlights & exposure). However, I wanted to see what other ones looked like just in case they worked even better. I duplicated one of the photos and put my usual 35mm preset on it and made a few small tweaks, however it didn’t look as good so I decided to stick with the original one.

Next up were the mirror photos. These weren’t planned – I only thought of the idea in the studio – but I’m really pleased with how they came out. I used the same preset as the previous ones, but it didn’t work as well. I then used a different one for red lighting (as the original lighting was very orange) and this one worked a lot better. I did experiment with changing the shadow hue to red to give a warmer feel to the photo and sent this to Grace, who preferred the one without.


For the red photos next to the light, I created an entirely new preset as none of the saved ones work due to how intense the red is in the photos. Red is a hard colour to edit, and I’m happy I was able to create a preset that perfectly captures the light without being too harsh. I used the Point Curve to mattify the shadows dramatically, and also add in some green to help balance the image.
With the behind the scenes photos, I used an entirely different editing style. I wanted a ‘classic’ feel to these, and love how black & white studio photos look. Therefore, I decided on the ones with white backgrounds to be in black & white. I also increased the grain to give them a 35mm feel. The ones with coloured lights did use the presets used above, but only as the black & white preset on these didn’t give the same feel.


FLOWVERS @ OLD CHAPEL STUDIOS - 02.05.2021
I bought my laptop to the shoot so was able to start editing inbetween songs. Whilst there, I used a 35mm black & white preset I already had from a previous shoot with a different artist. I knew I was going to create a new colour preset for these photos, but couldn't do it until I was home as there was a lot of light in the room, affecting my view of the photos. I was able to sort through most of the images at the shoot. This involved me rejecting the blurry/out of frame photos and narrowing down the pictures to only the best ones. I ended up taking over 1000 photos and got them down to less than 200.
Once I was home, I took off the black & white preset and created a new one especially for these photos. I wanted a 35mm-style preset with a blue and red shadows. To do this, I made basic edits to the exposure, contrast, shadows, highlights, whites and blacks, and then used the tone curve and carefully adjusted each one (tone, red, green and blue) until I was happy with how the photos looked. I edited the white balance and used the colour grading tool to emphasise the blue and red shadows and saved this as a preset. I then applied the preset to each photo and made small adjustments like exposure and highlights as the lighting changed throughout the day. I decided to put the 35mm black & white preset back on a few of the photos as I wanted to give them a 'classic' look and felt they would look a lot better in black & white. The band love black & white photos too, so I knew they would be happy with this.
Once this was done, I saved them in a low resolution and sent them to Flowvers to get their opinion. Once they looked through the photos and confirmed they were happy with them, I saved them in a higher resolution and sent them over to their manager using a WeTransfer download link. I shared a few on my Instagram and received high engagement and positive feedback from my audience.